Standing Desk DIY: Cubicle Edition
Lately, I’ve read several articles on standing desks and especially on the health risks of the modern office.
I wanted to try it out, especially since I pulled a muscle in my back a few month ago and, now that I’m all recovered, I don’t want it to happen again. The biggest problem with that for me, is that I spend a lot of time programming in a cubicle farm. I hadn’t seen a configuration yet that seemed like it would work well with cubes, but I think I finally managed to work one out.
So in order to work for me, in addition to being a functional work station and putting the keyboard and monitors at ergonomically correct heights, a potential standing desk had to meet several additional criteria:
*It couldn’t involve modifying the cube itself (the cubicle police would object).
*It had to work with an existing cube.
*It had to leave the cube completely undamaged and unmarred (no scratches, no nailing no clamping).
*It had to be stable (virtually no chance of tipping over)
*It had to be light weight (no chance of overloading the cube’s horizontal surface).
*It needed to be relatively portable (i.e. able to be moved if I change cubes)
*It had to be quick to set up (i.e. no lumber working) because I’m busy enough already.
*It had to be inexpensive, because if I don’t like it, it will be temporary.
*It would ideally be able to be repurposed, so if it doesn’t work out, it’s not a complete waste.I had thought about several different potential configurations in my head, but I couldn’t get it to work, and the biggest problem I had was how to get enough space for mousing, and this summer that problem was " magically" fixed.

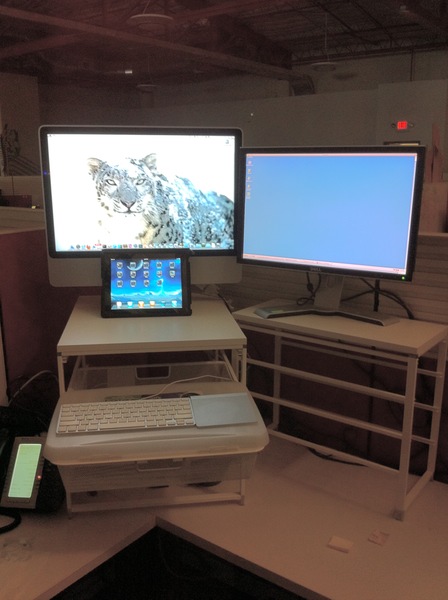
As a base, I used an elfa medium 4-runner drawer kit with a White Melamine Top.
It ends up being about 20 inches tall (after the no-scratch feet and the top). It’s stable, portable and fits on the cube desk well enough, but it was too tall to type (putting the keyboard on top, my elbows were lower than the keyboard). I used it for a few hours with my laptop sitting on top of it, and then I realized that one of the drawer rails was very close to being level with my elbow. So I went back to the Container Store and looked for a shelf to go in that rail. They don’t make them, and I couldn’t find anything the right size, so I got a drawer to go in the correct rail, and then found a lap desk

whose base fit perfectly into the top of the mesh drawer and rests on the rim.
The iMac goes on the Melamine top, and the keyboard and the magic trackpad go on the lap desk, which sits on the drawer, which is about 40% open. That mostly worked. That lap desk is slightly lower in the middle than on the edges, so I had to use Post-It notes as a shim to make the place where the keyboard and trackpad rest level with the sides. Then I could type just fine. Then I added an xtra-narrow 4-runner kit with top to use as a stand for the (to me) mandatory second monitor (it’s very convenient that they are exactly the same height).
So I ended up spending (roughly) $65 on the primary shelf, $55 on the secondary monitor stand, and an extra $45 on the keyboard drawer setup. I thought about saving $30 or so by having a 17"x24" sheet of 1/4" thick MDF or plexiglass cut to slide into the rails instead of using the drawer/lapdesk combo, and I still might, but I decided I preferred this setup because every single piece can be repurposed if I decide the experiment is a failure.
So far, so good. I’m quite happy with this setup. We’ll see how I feel after a full week or month.
Update: I made modifications noted here and here, and the desk I use at home I documented here.